Home Care Information for Post-Op Frenectomy
Dr. Kelly Jobe | Pediatric Dentist | St. Louis, MO
IMPORTANT: This packet includes information that will help you and your little one recover as best as possible. Please understand that sucking correctly and consistently after the procedure takes time. Improvements with feedings are usually gradual and may take anywhere from 2-4 weeks.
What You May Expect After Procedure
***Please be aware that the healing timeline below may not apply to every baby.***
Days 1-3
- Most babies will be very sore during the first 24-48 hours
- Expect baby to be fussier than usual
- Healing “white patch” forms
- Pain meds given as indicated
- Difficulty with latch may occur, refer to LC for “back up” feeding plan
- Have comfort measures prepared
Week 1
- Baby’s soreness starts to taper off days 7-10
- Baby may still be fussy
- Healing white patch continues to form
- Pain meds given as needed
- Follow up with LC to help baby re-learn new SUCK
- Follow up with bodyworker as needed Improvement may be minimal during first week.
Weeks 2-4
- Baby should not be sore and exercises are mildly irritating
- Healing white patch shrinking
- Pain meds not necessary
- New frenulum forming
- Bodywork and LC follow ups as needed
- Improved progress with feeding
Weeks 4-6
- Continue stretches Discomfort should be gone.
- Bodywork, OT, PT or LC follow ups as needed
- Continual progress with
feeding
Pain Management Recommendations
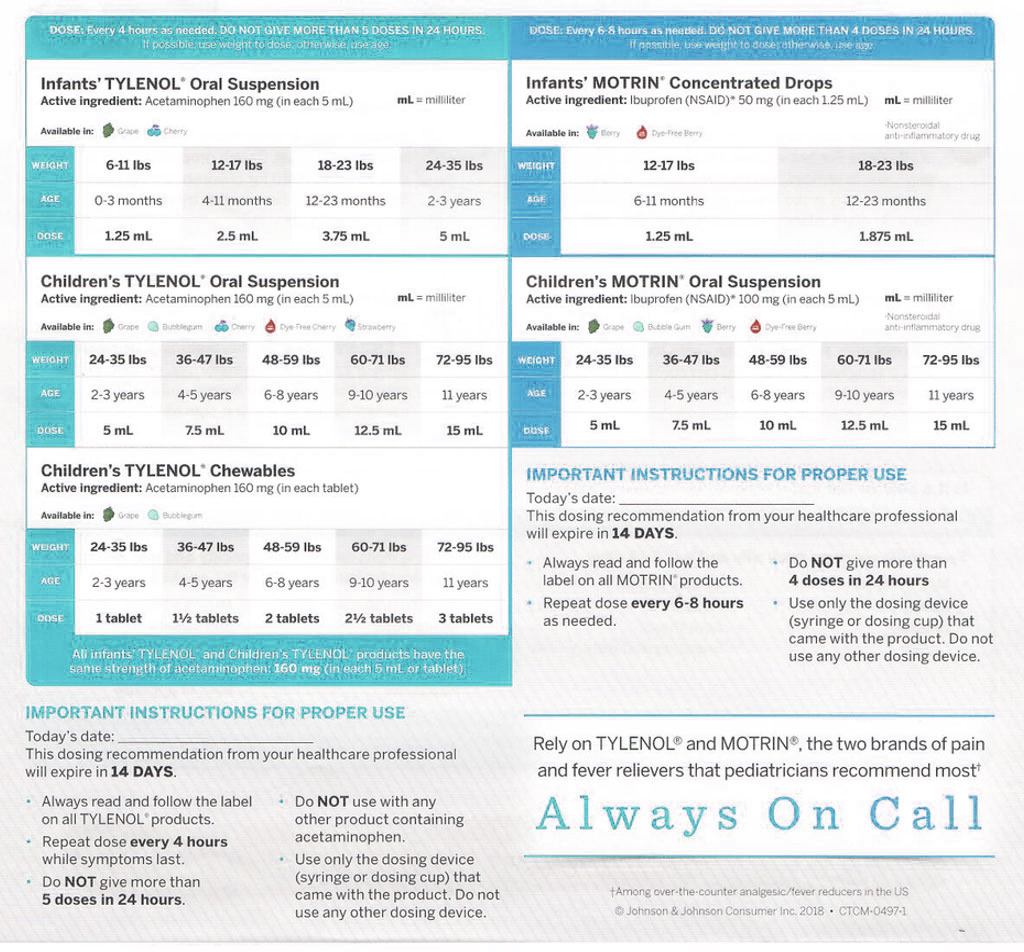
Under 6 months
Infant Acetaminophen/Tylenol (160 mg/5 ml concentration)
Dose based on weight. Give every 4-6 hours for the first few days as needed for pain.
[Arnica Montana 200C, Hypericum 200C, Aconitum 200C, Bryonia 200C), Rescue Remedy
Homeopathic remedies used to treat pain and inflammation Instructions: Dissolve 5 pellets of each, plus 7 sprays Rescue Remedy in 1 ounce pure water.
- Give approximately 3-4 drops every 15 minutes as needed the first few days, then every 90 minutes or as needed. Administer 3-4 drops every time you do exercises or wound care for 24 hours.
Over 6 months
Children's Ibuprofen/Advil/Motrin
Infant’s drops (50 mg/1.25 ml) or children’s concentration (100 mg/5 ml.)
- If infant is older than 2 months and Tylenol is ineffective, get consent from pediatrician for ibuprofen use.
- Dose based on weight every 6-8 hours as needed for pain
Safe for all ages
Frozen Breastmilk
- Either scrape up with a spoon (like a slush) or freeze in a plastic bag and break off a chunk
- Place under the lip or tongue to help with pain and swelling
Soothing Gels/Oils "no numbing gels or anything containing benzocaine"
- Simply apply small dab to treated areas 4-6 times a day
- Recommended Options: Hyland’s Teething Gel, Orajel Naturals, Organic Coconut Oil
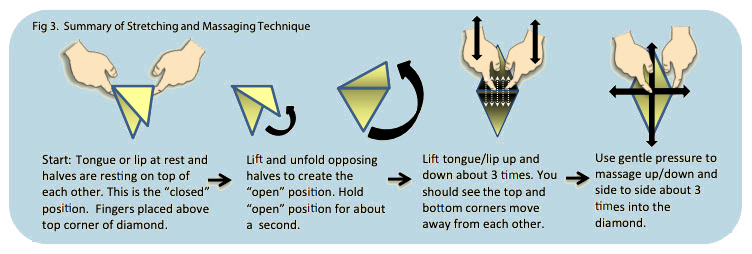
Stretching Exercises:
- Rule of 5’s – Perform the stretches 5 times a day, for 5 rounds, of 5 seconds each.
- Please do one round of exercises before bed on the day of the procedure. On the following day, you should begin the stretching protocols listed below. Consistency is key. Do NOT exceed more than 5 hours between stretches. If an infant, try to get a round of stretches in overnight.
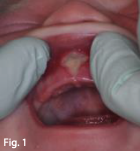
Lip Stretch:
- With clean hands, grasp the upper lip and lift up and back towards the nose. Hold this position for 5 seconds. (see fig 1)
- Using the pad of your fingertip, make a “J” shaped swoop motion drawing down and up toward the nose.
- Then use the pad of your index finger the massage along the gum ridge as if you were brushing imaginary teeth. Be gentle but firm and make sure you rub high into the fold under the lip. Rub about 5 times side to side and up and down.
Tongue Stretch:
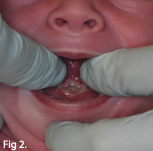
- With clean hands, place both index finger tips at the left and right corners of the diamond. Allow fingers to sink down into the floor of mouth and engage closer together. (see fig 2)
- Using the pad of your fingertip, make a “J” shaped swoop motion drawing down and lifting the tongue up from the floor of mouth.
It is helpful to use the other remaining fingers to push down on chin to help keep mouth open. - Use both index fingers to lift the tongue up and down for 5 reptitions. Your fingers will do an upside down “come here” motion. When done correctly the tongue should lift and diamond will unfold.
- Gently massage into the diamond up and down and side to side using moderate pressure.
Please take note of the “white diamond patches”. The released area will form a wet scab after the first day. It will appear white and soft because it is wet. This is nature’s “band aid”. It is not always white and in some cases it can be yellow, greenish, or grey. The diamond will usually peak in size by day 7 and shrink from days 7-21.
Make sure you are gently rubbing into this scab because the healing is occurring underneath it.
After one week, the white area will get smaller each day, but HEALING IS STILL HAPPENING! So even though the scab will heal, you must continue the stretching or the new frenum will not be as long as possible and the procedure may need to be repeated for optimal results.
Helpful Tips
- If your child is extra fussy or inconsolable, be sure to use lots of skin to skin contact. This increases oxytocin levels which lowers pain.
- If your baby is struggling to latch, try a nice warm bath to soothe them.
- Using good lighting during the stretches really helps visualize the diamonds and ensures accurate technique.
- Frozen breast milk can act as a natural numbing agent and help with pain.
- It may be best to feed before stretching during the first few weeks, while infant is most sore.
Normal Things You May Notice After the Procedure
- Increased fussiness and inconsolable crying during the first week
Immediately after the procedure, it is best to give pain medication(s)around the clock in order to stay ahead of any discomfort. This may be necessary during the first few days and sometimes up to one week. - Bleeding after doing the stretches
Keep in mind that a little bit of blood in a pool of saliva is not as bad as it looks. This is not a concern and it is safe to feed your baby. - Difficulty latching during the first week
Due to the initial soreness and re-learning of suck, feedings may be inconsistent during the first week. In some cases, symptoms may worsen before it gets better. It is critical to follow up with your IBCLC for any troubleshooting issues. - Increased choking and spitting up
Initially, babies may have a hard time adjusting to the change in latch. This is usually temporary
and should be addressed with your IBCLC. - Increased drooling
The healing process increases saliva production and the new movement of tongue
creates a surplus of saliva. This is usually temporary. - Increased sleeping
This may be due to medication, exhaustion, or that the infant is feeding better and is more satisfied. Sleep may also act as a coping mechanism for discomfort.
When you need to call the doctor:
Although rare, please do not hesitate to call is if your child experiences any of the following:
- Fever greater than 101.5⁰
- Uncontrolled bleeding
- Refusal to feed (bottle and/or breast for over 8 hours)
- Not producing wet diapers
For Infants Only:
Important: Suck training exercises are helpful for regaining proper tongue function. The exercises below are NOT intended to replace the in-person help of a lactation consultant or health care professional.
Use these exercises before feeding or as a playtime activity. Be sure to stop any exercise that your baby dislikes. It is not necessary to do every exercise; only sure those that are helpful for your baby. Before beginning, wash your hands and be sure nails are short and smooth. It is best to work directly with a lactation consultant to determine which exercises are best for your baby.
Exercise 1: Finger Sucking
Use a finger that closely matches the size of your nipple. Place the backside of this finger against the baby’s chin with the tip of your finger touching the underside of the nose. This should stimulate the baby to gape widely. Allow the baby to draw in finger, pad side up, and suck. The tongue should cover the lower gumand your finger should be drawn into the juncture of the hard and soft palate. If the tongue is not forward over the lower gums, or if the back of the tongue bunches up, gently press down on the tongue (saying “down”) and use forward (towards the lips) traction.

Exercise 2: Down and Out Stroking
Begin as in exercise 1, but turn finger over and press down on the back of the tongue and draw slowly out using downward and forward (toward lips) pressure on the tongue. Repeat a few times.

Exercise 3: Lateralizing Side to Side
Gently stroke the baby’s lips until the mouth opens, and then stroke the lower and upper gums side to side. The tongue should follow your finger.

Exercise 4: Circular Strokes
Touch the baby’s chin, nose and upper lip. When the baby opens wide, gently massage the tip of the tongue in circular motions pressing down and out, encouraging the tongue to move over the lower gums. Massage can continue back further on the tongue with light pressure as the finger moves back on the tongue and firmer pressure when the finger moves forward. Avoid gagging baby.

Exercise 5: Desensitizing Gag Reflex
If a baby has a high or narrow palate and gags on the nipple or insists on a shallow latch, it may help to desensitize the palate. Begin by massaging the baby’s palate near the gum-line. Progressively massage deeper, but avoid gagging the baby. Repeat exercise until the baby will allow a finger to touch his palate while sucking on a finger. It may take several days of short exercise sessions to be effective.
Tips for the TIGHT and TENSE baby:
If your baby does not open wide, a gentle massage may help relax the jaw and facial muscles. A skilled body worker such as a chiropractor, osteopath, or craniosacral therapist who specializes in infant care may also help your baby. Begin with a light fingertip circular motion under the baby’s jaw from back to front on both sides. Using fingertips, massage baby’s cheeks from the center toward the temple on both sides. Massage in tiny circles around the mouth, near the lips, clockwise and counterclockwise. Massage around the baby’s mouth near the lips from center outward, on both sides of the mouth, top and bottom. Gently tap a finger over baby’s lips and massage baby’s chin.
Tips for the TIGHT and TENSE baby:
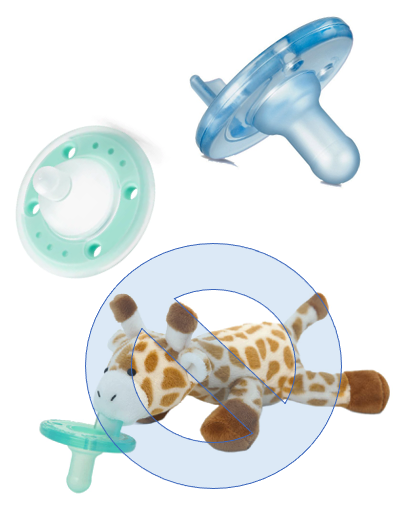
PACIFIERS
If your child will use a pacifier, we recommend the following, as they are best for oral development:
• Avent soothie (typically given at birth in the hospital)
• Ninni Co.
AVOID wubbanub pacifiers as they put added pressure on the front teeth area and constrict the palate.
Tips for the TIGHT and TENSE baby:
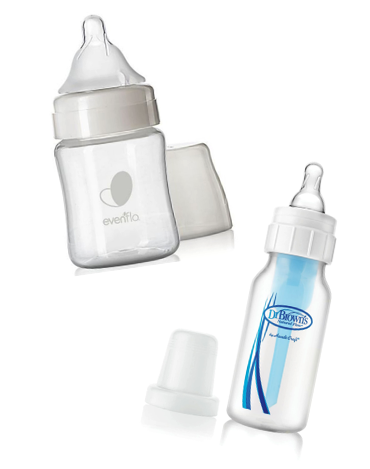
BOTTLES
Bottle feeding may resume immediately after a frenectomy procedure as it gets the new mouth muscles working immediately.
If choosing to bottle feed your child, we recommend the following, as they are best for oral development:
• Dr. Brown’s Narrow
• Even-flo Balance
Additional Therapies
BODY WORK
Body work is the general term used to describe therapies that may help relieve and normalize structural issues in the body. Some babies may need more body work than others. Babies who receive some form of bodywork seem to heal and rehabilitate better. Some types of therapies are listed below:
TUMMY TIME
This is a simple at-home therapy you can perform a few times a day for 5-20 minutes. This may help your infant gain strength in the neck muscles that support proper sucking.
CRANIOSACRAL THERAPY
Craniosacral Therapy (CST) is a gentle hands-on approach that releases tensions deep in the body to relieve pain and dysfunction. It also improves whole-body health and performance. CST is usually performed by a chiropractor or osteopath.
MYOFASCIAL RELEASE THERAPY
Myofascial release therapy is a safe and very effective hands-on technique that involves applying gentle sustained pressure into the myofascial connective tissue restrictions to eliminate pain and restore motion. It is usually performed by a physical or massage therapist.
Oral Motor and Sensory Therapy
Oral Motor and Sensory Therapy are different than bodywork and takes a comprehensive approach to assess sucking, swallowing, and general feeding issues. We can provide you a referral to a highly skilled therapist. The following types of providers may help:
- IBCLC (International Board-Certified Lactation Consultant) – Some IBCLCs may have extra training in suck dysfunction.
- OT/PT (Occupational or Physical Therapist) – May help with feeding difficulties in infants/children.
- SLP (Speech Language Pathologist) – May help with speaking and/or feeding difficulties in infants/children.
- OMT (Oral Myofunctional Therapist) – OMT is a relatively new and emerging field, and this type of specialist helps restore proper muscle balance and function of the mouth.
For Older Children & Adults:
FUN with FOOD
Making exercises fun and exciting, rather than a “job” can aid in their cooperation. Below are a few fun exercises they can do with food and a few other handy items:
Sticky Lick
Put a dollop of peanut button, Nutella, honey, or something sticky at the bottom of a shot glass or a medicine cup. Ask your child to use their tongue to reach into the cup and lick out the sticky stuff from the bottom. Challenge them to clear the cup completely. This will work their tongue muscles to the max!Cheerio Balance
Place a cheerio n the tip of your child’s tongue. Challenge them to place their tongue, while balancing the cheerio, into “the spot” on the roof of their mouth and see how long they can hold it there. Work your way up to longer and longer stretches of time.Popsicles // Xylitol Lollipops
Give your child a special treat like a popsicle or a tooth friendly lollipop (Xylitol – Dr Johns or Zollilolli) and challenge them to lick it without putting the whole thing in their mouth…using only their tongue.
EXTRA HELPERS
Here is a list of a few other items available to assist with exercising/stretching:
Myo-spots (a little tablet that sticks to “the spot” in the roof of the mouth and entices the tongue to lift up.
Bite Block/Mouth Rest (to assist in stretching without your child closing down on your fingers if molars are present)
Youtube Video of Exercises: https://www.youtube.com/watch?v=ouuIOo5F0aQ
(Search: Myofunctional Therapy Exercises with Dr. Audrey Yoon #3: After Frenuloplasty/Frenectomy Surgery)
What Our Patients Say
Dr. Kelly Jobe & her staff are passionate about providing the best pediatric dental care in St. Louis, MO!
Stay connected with Kids Smiles
Stay connected with Kids Smiles
Quick Links
Contact Info
-
Kids Smiles Pediatric Dentistry
9735 Landmark Parkway Dr.
Suite #16 St. Louis, MO 63127 - (314) 270-5817
- info@kidssmilesdentist.com
© Copyright Kids Smiles Pediatric Dentistry. All rights reserved. Privacy Policy.